
Have you ever wondered how movie scenes transport you to magical worlds or how YouTubers and content creators seem to appear in different places instantly?
This visual trickery is made possible by a powerful video editing technique called chroma key, more commonly known as green screen editing.
Whether you’re a filmmaker, a YouTuber, or just someone who loves experimenting with videos, using a green screen can significantly enhance your content. The best part is that you don’t need to be a professional to use this technique; with the right tools, like chroma key video editor Wondershare Filmora, you can master it in no time.
In this guide, we will explore what chroma key technology is, provide a step-by-step tutorial on how to use the green screen tool in Filmora, and discuss when to use a green or blue screen for your video projects.
Part 1: What is Chroma Key?
Chroma Key is a cool feature in the green screen video editor Wondershare Filmora that lets you change the background of a video to any picture or color you like. It’s often called “Blue Screen” or “Green Screen” because it uses these colors to make the magic happen. Chroma Key has many uses and benefits, and if you haven’t tried it yet, you’re missing out on some amazing effects!
So, what exactly is Chroma? It’s just a special color, usually blue or green. Green is often used in different industries for special effects.
For example, in the film industry, when making Hollywood movies, the crew often uses Chroma Key effects to make an indoor studio look like any place they imagine — from outer space to a magical land! Another great example is the news media. They often place their reporter in front of a green screen and then add any background they want, like a map or a cityscape.
Now that you know a bit about how Chroma Key works, let’s learn about the differences between using a Green Screen and a Blue Screen in the next section!
Part 2: What is the Difference Between Green Screen and Blue Screen
At first, it might seem like the only difference between a green screen and a blue screen is their color. But there are actually some important differences! Let’s look at each one to see when it’s better to use one over the other.
What They Have in Common
Both green and blue screens are popular for special effects in videos. However, the green screen is often used in movies and news shows.
Color Spill: Sometimes, when using a green screen, you might notice that some green color shows up on the person or object being filmed. This usually happens when they are standing too close to the screen. To avoid this, it’s best to keep some space between the green screen and the person.
Luckily, the Chroma Key tool in Filmora helps fix this problem automatically! But if you want to avoid color spills altogether, a blue screen can be a better choice because it doesn’t cause as much color spill as a green screen.
Contrast: Even though the green screen is more common, the blue screen still has its place! For example, if the person you are filming is wearing green clothes, they will blend into the green screen and become invisible — like camouflage! In this case, a blue screen is a much better choice.
Lighting: For Chroma Key to work its magic, the screen needs to be well-lit. A green screen works best when it’s smooth, wrinkle-free, and doesn’t have any shadows. When the green screen looks like one solid color, you get the best results. Blue screens, on the other hand, don’t do as well with lighting. That’s why green screens are often chosen for larger scenes.
So, while both green and blue screens are great for special effects, each one has its strengths depending on what you need for your video!
Part 3: How to Edit with the Green Screen Tool
Many green screen video editing software options are available today, but you might find Wondershare Filmora Green Screen Editor a great choice. It’s a reliable tool that makes creating videos with green screen scenes simple. Layering scenes in Filmora is easy and can be done in just a few steps. To get started, click the Free Download button and install Filmora on your computer.
Here we will guide you on how to use green screen footage to composite Chroma key videos using Filmora.
Step 1: Import Your Videos
First, open Filmora and start a new project. You need to add two videos to your Media Library: the video with the green screen (where you filmed your subject) and the background video or image you want to use. Drag the green screen video to the second track on the timeline and the background video or image to the first track.
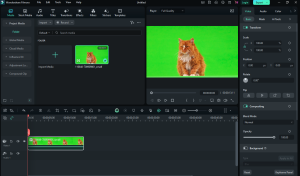
Step 2: Change the Green Screen Settings
Double-click on the green screen video to open the Edit Panel. In the window that pops up, find the “Video” tab and check the “Chroma Key” option to turn it on. This will allow you to see tools like:
- Offset:Helps to make the background more visible.
- Edge Feathering:Softens the edges of your subject.
- Edge Thickness:Adjust the thickness around the edges of your subject.
- Alpha Channel:Turns the video into black and white to show which parts are being removed.

These settings help make your subject look like it belongs with the new background. If your background is blue instead of green, just use the eyedropper tool to click on the brightest part of the blue screen to change it.
If the green screen doesn’t cover the whole frame, go to “Effects”, find “Crop” and add it to your clip. Double-click the clip to adjust the crop so only the green screen shows around your subject. Make sure your subject is surrounded by green for the best result!
Step 3: Place Your Background
Next, position the background video or image on the timeline. The green screen area will now show the background you chose, and both clips will look like one! Adjust the size of your subject to make everything fit together nicely.
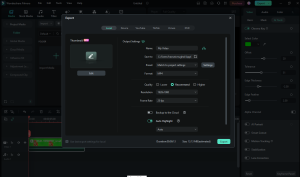
Step 4: Save Your Video
Finally, export your finished video in a format like MP4, WMV, or MOV. Now, your video is ready to be shared!
For extra help, check out the video tutorial on our page, and have fun using the Chroma Key tool to create awesome videos with new backgrounds!
Conclusion
Using chroma key technology with a green screen video editor, the Wondershare Filmora green screen tool can transform your video projects into something truly unique and professional. Whether you’re creating content for fun or professionally, understanding how to use green screens can open up endless creative possibilities!
By mastering these techniques, you can add new dimensions to your videos and bring your imagination to life.